If you are reading this then you are thinking about or have just started creating a blogging website. Here I will be giving you three jobs you need to do before blogging starts.
Sometimes knowing where to start can be a huge hurdle to overcome. You may have looked at lots of other people doing similar things, been inspired by many and yet all of their sites are all different so what do you need to do to make it similar and yet your own.
I will be giving you three jobs you need to do to make sure you are ready to blog.
And you need to be ready as to stand any chance of being a success in the online world you need to satisfy two things. Search engines and your customers. These three jobs will make sure you can satisfy both.
All Search engines want one thing. Relevant content. Content that is unique, makes sense and is for the use of the visitors to that site.
If you can build your website in a way that is ready for SEO ( search engine optimisation ) and create good and relevant content, you are going to have an excellent chance of succeeding within the online world and therefore reaching your potential customers.
The thing that a lot people worry about is being a “writer”, you DO NOT have to be a writer or an author to be successful online.
You just need to communicate with your audience, just the way you would with a friend or a family member. If you also put an emphasis on helping people, you will be able to build trust, which will lead to a long term and sustainable life online.
I personally use a platform within wealthy affiliate called Site Content which makes my life as a blogger much easier when it comes to writing content. It gives me the ability to write as I think then have it checked over by the platform so I can correct;
Grammar and spelling
Duplicate content
SEO analysis
Content structure
Vocabulary
If you are worried about your writing skills, the SiteContent platform helps you to understand where you are making writing errors and helps you to correct them in a very efficient manner.
Your own website host may have such a facility. If not then you may want to check out wealthy affiliate as an alternative host. Any domain name can be swapped over to wealthy affiliate. You can check out my Wealthy Affiliate personal review here.
Now we are going to look at the first steps in writing content. I am also going to assume you are using WordPress for your website or blog as that is the most common. Apologies if you are not but the same principles will still apply.
Create an About me page
To establish any brand, blog or website online, you need to build trust with your audience or customers. The best way to do this is through an “about me” type page. I don’t know about you but when I read a blog or article I always go check out the About me page. I want to know who is writing this stuff. And I can be sold or unsold by what is written there and if there isn’t one I assume it’s some kind of generic piece pushed out by an online robot.
Every successful website will have some kind of information about their brand or who they are and why they want to help people.
The first thing you need to do is choose a title that is appropriate. Here are some options that I suggest you choose from.
About Me
About NAME (e.g. About Karen )
About SITE (e.g About Websites for dummies, About WFD)
About Us
I think the most natural and the one that I use is “About Me” or “About Karen”, because it is the most direct and honest. It feels like I am here for you and I am here to help. And I Am.
There is one exception. I also have a website called Training my toy poodle and the about me page is called About Ralph because that is who the site is about. Obviously I write a little about myself too.
Now you need to create the content. Below is a template and as you write this page you can add different headings and of obviously you are in full control of the content and your story.
About me template:
A brief welcome to your site – just one paragraph.
YOUR STORY
Share something about your life that will be interesting and relevant to your niche – several paragraphs
WHY YOU WANT TO HELP PEOPLE
Why do you want to help people in your respective niche? – a couple of paragraphs
THE GOAL OF YOUR SITE
What is the purpose, goal of your website – just a couple of paragraphs
If you ever need a hand or have any questions, feel free to leave them below and I will be more than happy to help you out.
Choose “Post”, not a “Page” within WordPress for this. Posts allow for comments and this is a place on my website where I want to allow people to leave comments and give me feedback.
Now if I were you, at this point I would be heading over to the about me page so I will make it easy for you. Here’s my link and it will open in a new page so you can come back here and learn some more.
Since it was you who wrote your About Me page it will be 100% unique.
Add a Privacy Policy page
All affiliate programs and all advertising platforms require you to have a “Privacy Policy” on your website. This is a formality and it is very much a standardised document.
Within wealthy affiliates there is a full template where the only thing you have to do is change:
Your domain. Com to your website URL
There are about 10 instances of this that you will need to update within the Privacy Policy.
Then you will want to change:
My email@Myemail.com to Your Email Address
Go on, you can pop over to my privacy policy and copy and paste that one if you want. Here’s the link so you can get it.
Once you have updated the changes so it’s about your website and not mine and has your email you will want to Publish the Privacy Policy to your website as a Page.
The reason you want to create this as a Page and not a Post is because Pages don’t allow comments. You don’t want people commenting on your Privacy Policy. You are going to want to allow for comments and engagement on the rest of your website as these help with rankings in search engines.
PleaseNote: Your Privacy Policy is duplicate content because it is a standardised document so you will need to block the search engines from seeing this. Search engines hate duplicate content and will punish you in terms of rankings.
Within WordPress and after you publish your Privacy Policy, you need to log into the back office of your website or your WordPress Admin area
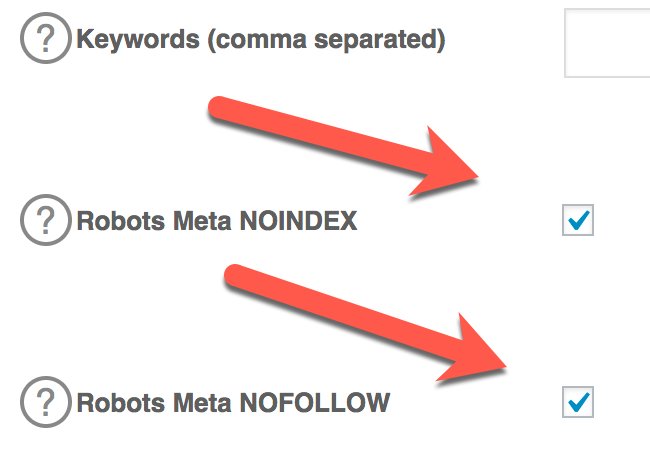
When you are within the editor for this page, scroll down to the bottom of the page and you will see the following settings.
Tick the Robots Meta NOINDEX and the Robots Meta NOFOLLOW. These will make sure this page does not get indexed in search engines and especially Google.
Create a Menu
Your last job is to set up the navigation on your website. The WordPress menus can work in very odd ways and can often be difficult to manage, which is why I want you to create a Custom Menu and understand how to use it right from the outset . Don’t panic if you are a way in to your business or blog, all can be rectified.
Navigation is vital to your customers experience and to your rankings (Google ranks sites with proper navigation better), so this is an important step.
Within wealthy affiliate there is a video which walks you through the process of creating custom menus. You can check it out here.
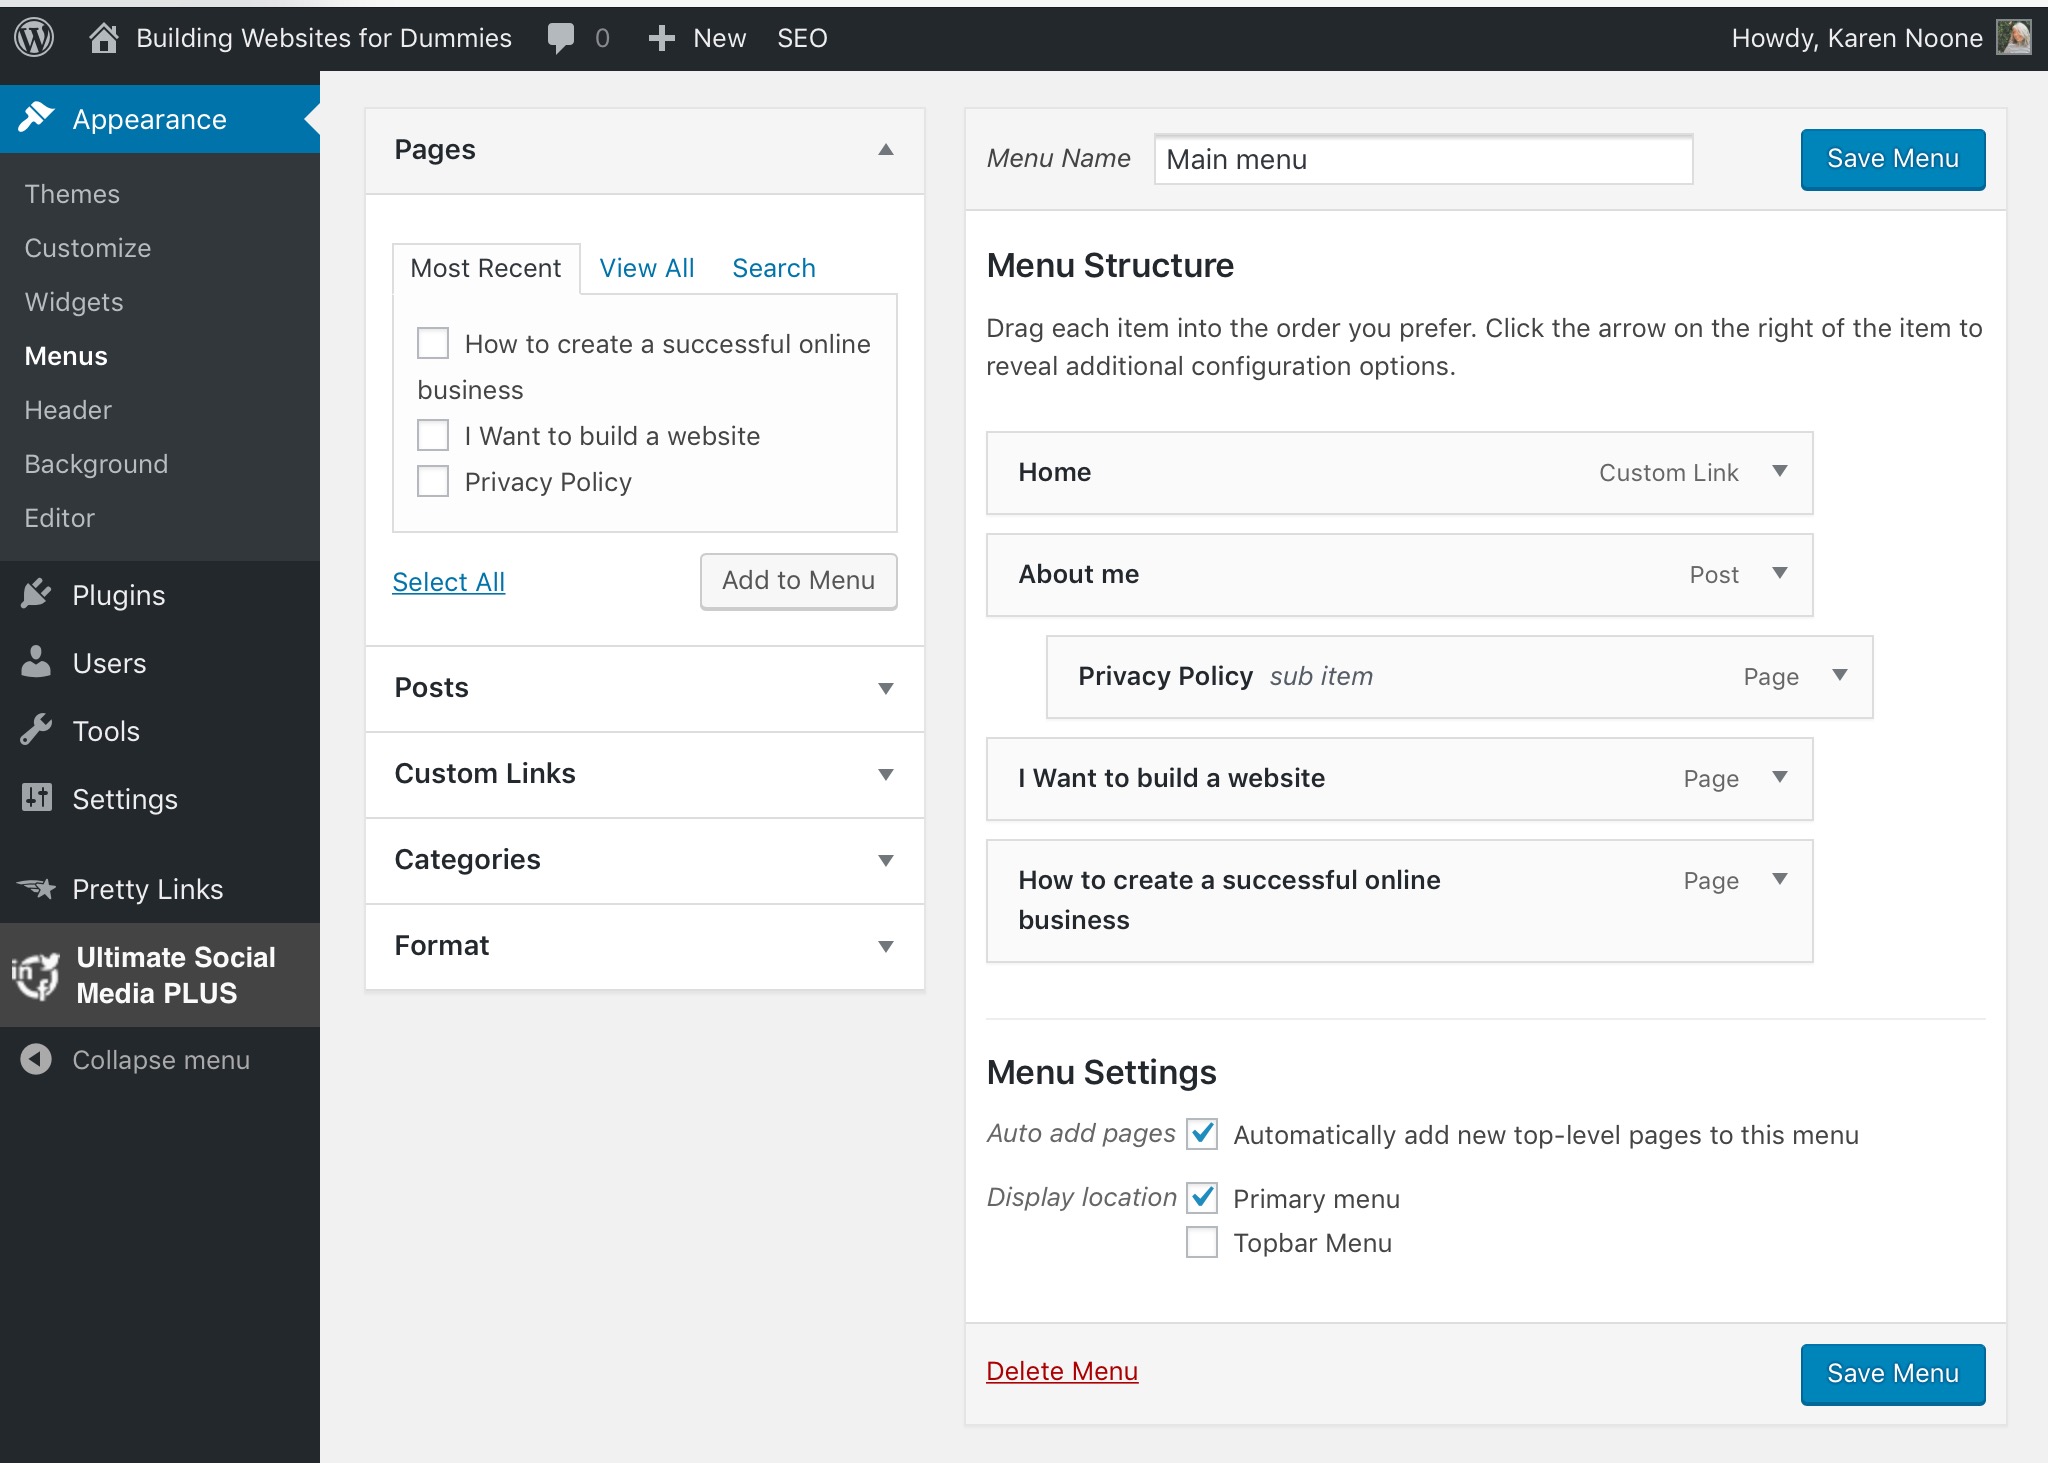
There are a few simple steps to creating a custom menu. The first thing you need to understand is where to find the Menu management section within your WordPress admin area.
Under Appearance, click the Menus sub heading.
This will take you to the custom menu creator. Under the left tabs, you will see a Pages section. Posts are not added to your navigation by default, so you need to click the Posts tab and it will show a list of your Posts.
Click the check box associated with your About me post, and then click Add to Menu. Note: Most themes by default will add Pages to the top menu, but if you don’t see your Privacy Policy within the Menu Structure section, you will need to add that.
Your About Me page has now been added to your menu.
Once this is added to your Menu You can reorganise your menu in any way you like, I add my About Karen post above the Privacy Policy, which means it is going to be put to the “right” of this within the live menu on my website.
Under Menu Settings, Find make the Display location, Main Menu. Tick this box as this will put this menu as your main navigation at the top of your page. Upon doing this, click the “Save Menu” button and you are done.
And so we are done. You have set up your initial content framework on your website, you also have your initial navigation set out. Doing these three things and getting them right are the first steps in satisfying both your customers and the search engines needs.
I hope this has been useful and that you feel you can move forward with your blog or website with confidence. Please feel free to ask any questions in the comments section below and I will get back to you as soon as I can.
If you want to join me at wealthy affiliates to learn even more. Click here and I will be ready to say hello.
With Grace and Gratitude
Karen
This Post contains affiliate links which means if you click on one and then go on to make a purchase, I will earn a commission but it won’t cost you any more


Leave a Reply